
Compiling Unreal Engine From Source Code
Jump start your Unreal Engine source code build
Quickstart
Note
This guide is created specifically for each platform editor, from a clean environment. More detailed steps for building other specific target platforms will be added later.
- Obtain access to the Unreal Engine repository. Follow this official guide if you can’t access the repository.
- Clone the repository to your local disk. Use git shallow clone if you don’t need any
githistory. - Run the included
Setup.batwithin the cloned repository. - Generate the project files using
GenerateProjectFiles.bat. - Open the generated
.slnfile using your preferred IDE. - Build the Unreal Engine solution with the Development Editor x64 configuration selected.
- Get access to the Unreal Engine repository. Follow this official guide if you can’t access the repository.
- Clone the repository to your local disk. Use git shallow clone if you don’t need any
githistory. - Run the included
Setup.commandin the cloned repository. - Generate the project files using
GenerateProjectFiles.command. - Open the generated
UE5 (Mac).xcworkspacefile using Xcode. - Build the Unreal Editor by selecting the
UnrealEditorschema.
- Obtain access to the Unreal Engine repository. Follow this official guide if you can’t access it.
- Clone the repository to your local disk. Use git shallow clone if you don’t need any
githistory. - Run the included
Setup.shwithin the cloned repository. - Generate the project files using
GenerateProjectFiles.sh. - Open the generated solution file with your preferred IDE or directly run
make.
Detailed setup
While Unreal Engine is primarily written in C++, it has partial platform agnostic features allowing the editor to be built on various platforms, including Windows, Mac, and Linux.
Build environment
For this setup, Visual Studio Community 2022 will be used as the base IDE instead of the recommended, but older Visual Studio Community 2019. There are several ways to install the IDE:
WinGet
-
Run WinGet in an elevated terminal:
Terminal window winget install Microsoft.VisualStudio.2022.Community --silent --accept-source-agreements --accept-package-agreements --override "--wait --quiet --add ProductLang En-us --add Microsoft.VisualStudio.Workload.ManagedDesktop --add Microsoft.VisualStudio.Workload.NativeGame --includeRecommended" -
Since UE4.27+ is set to target older .NET framework, MSBuild must be selected from either Windows 10 SDK version
10.0.18362.0or10.0.19041.0. Disable other Windows SDK and only select the aforementioned version.
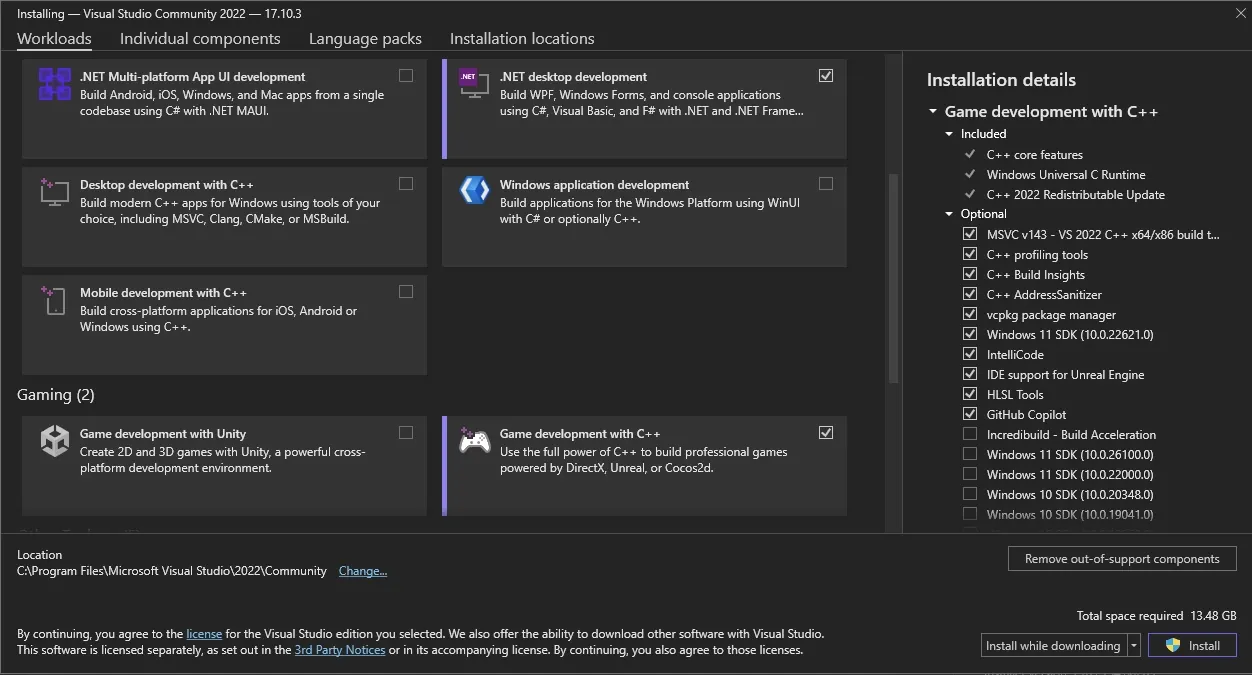
GUI
-
Download Visual Studio Community 2022 and install in your system.
-
In the package selection, select these packages:
- .NET desktop development
- Game development with C++
Xcode
- Make sure the latest Xcode is installed.
- (Optional) Enable the target platform that you intend to build to.
- Install Xcode Command Line Tools. If you aren’t sure whether it is installed or not, you can input this command in the terminal:
A message will pop up letting you know if it is installed. Otherwise, a prompt will ask you to install the tool.
Terminal window xcode-select --install
For this setup, VS Code will be used as the base IDE. There are several ways to install the IDE:
VSCode
Debian/Ubuntu
- Download the
.debpackage x64 or from the VS Code website. - Update the
aptrepository with elevated permission:Terminal window sudo apt update - Install the
.debpackage:Terminal window # Ignore the sandbox error if running from non-root terminalsudo apt install -y code_<version>_amd64.deb
Installing the .deb package will automatically install the apt repository and signing key to enable auto-updating using the system’s package manager. For other ways to install VS Code, please visit the Linux setup page.
RHEL/Fedora/CentOS
VS Code has a stable build in the yum repository. The following script will install the key and repository:
sudo rpm --import https://packages.microsoft.com/keys/microsoft.ascecho -e "[code]\nname=Visual Studio Code\nbaseurl=https://packages.microsoft.com/yumrepos/vscode\nenabled=1\ngpgcheck=1\ngpgkey=https://packages.microsoft.com/keys/microsoft.asc" | sudo tee /etc/yum.repos.d/vscode.repo > /dev/nullThen update the package cache and install the package using dnf (Fedora 22 and above):
dnf check-updatesudo dnf install code # or code-insidersCompiler
Unreal Engines uses Clang for building its Linux editor. GCC can also be used to compile Unreal Engine editor, but may not fully supports for targeting Linux or building third-party plugins.
Debian/Ubuntu
sudo apt install build-essentialRHEL/Fedora/CentOS
sudo dnf groupinstall "Development Tools" "Development Libraries"Generating project files
-
Install dependencies with
Setup.bat -
Since .NET 4.5 and older versions are no longer being maintained by Microsoft, all of the existing UE4 packages must be set to target at least .NET 4.6 or newer. Update all
.csprojandapp.configto use .NET 4.6 or newer.Terminal window # Regex replace .NET 4.5 and lower to .NET 4.6 or newer.Get-ChildItem -Path . -Recurse -Filter "*.csproj" | ForEach-Object { (Get-Content -Raw $_) -replace "<TargetFrameworkVersion>v4\.[0-5].*<\/TargetFrameworkVersion>", "<TargetFrameworkVersion>v4.6.2</TargetFrameworkVersion>" | Set-Content -NoNewline $_ }# Regex replace .NET 4.5 and lower to .NET 4.6 or newer.Get-ChildItem -Path . -Recurse -Filter "*pp.config" | ForEach-Object { (Get-Content -Raw $_) -replace "NETFramework,Version=v4\.[0-6]", "NETFramework,Version=v4.8" | Set-Content -NoNewline $_ } -
To enable
GenerateProjectFiles.batsupport for Visual Studio Community 2022, a new switch andMSBuildbinary must be added to these files:Engine/Build/InstalledEngineBuild.xml <Option Name="VS2019" Restrict="true|false" DefaultValue="false" Description="Use Visual Studio 2019 to build Windows targets. By default, Visual Studio 2017 is used for maximum compatibility"/><!-- Whether to use VS2022 --><Option Name="VS2022" Restrict="true|false" DefaultValue="false" Description="Use Visual Studio 2022 to build Windows targets. By default, Visual Studio 2017 is used for maximum compatibility"/>...<Property Name="VSCompilerArg" Value="-2019" If="$(VS2019)"/><Property Name="VSCompilerArg" Value="-2022" If="$(VS2022)"/>Engine/Source/Programs/UnrealBuildTool/Platform/Windows/UEBuildWindows.cs public static bool TryGetMsBuildPath(out FileReference OutLocation){// Get the Visual Studio 2022 install directoryList<DirectoryReference> InstallDirs2022 = WindowsPlatform.FindVisualStudioInstallations(WindowsCompiler.VisualStudio2022).ConvertAll(x => x.BaseDir);foreach (DirectoryReference InstallDir in InstallDirs2022){FileReference MsBuildLocation = FileReference.Combine(InstallDir, "MSBuild", "Current", "Bin", "MSBuild.exe");if (FileReference.Exists(MsBuildLocation)){OutLocation = MsBuildLocation;return true;}}...} -
Generate project files specifically for Visual Studio 2022.
Terminal window # This will generate project files specific to Visual Studio 2022.\GenerateProjectFiles.bat -2022 -
Open the generated
.slnfile with Visual Studio Community 2022. -
Right-click UE5 and select Build or directly run the local debugger (
F5) in Development Editor x64 configuration.
- Install dependencies with
Setup.command. - Generate project files with
GenerateProjectFiles.command. - Open the generated Xcode workspace files according to your target platform. For this tutorial, open
UE5 (Mac).xcworkspace. - Select
UnrealEditoras the active schema. - (Optional) Add
IDEPreferLogStreaming=YESto the schema environment variable to enable streaming logs into Xcode. - Build and wait for the project to compile and launch Unreal Editor.
- Install dependencies with
./Setup.sh. - Generate project files with supports for VSCode using
./GenerateProjectFiles.sh -vscode. - Open the generated
.code-workspacefile with VSCode. - Run the debugger profile
Launch UnrealEditor (Development). - Wait for the compilation to finish. It will launch the Unreal Editor once the compilation is completed.